Computer Vision for Life Sciences: Building an Automated Urinalysis Scanner
A technical deep dive into the image processing pipeline for reading a standard urine dipstick with clinical-grade accuracy
The Unseen Challenge of a Common Test
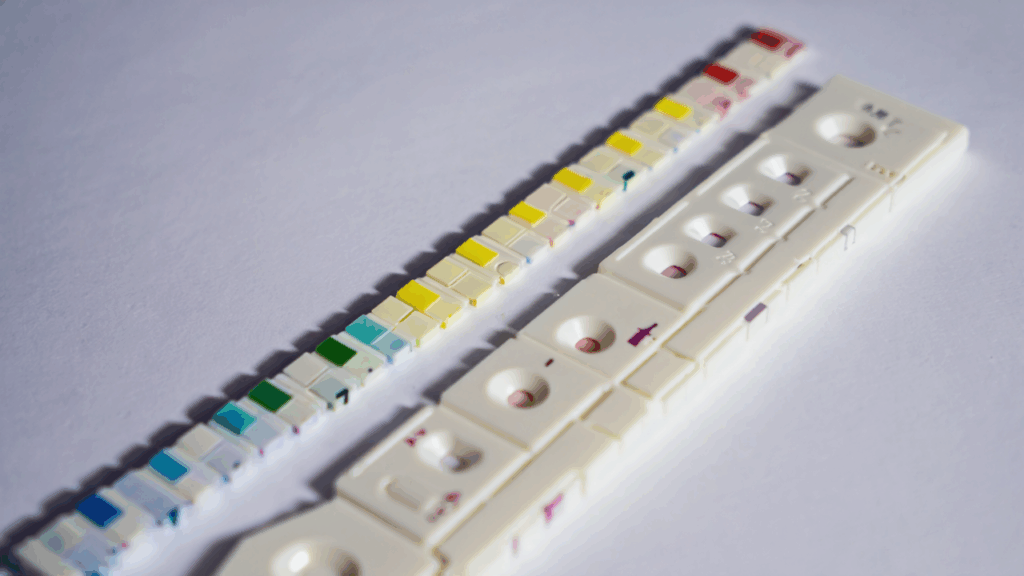
Urinalysis is one of the most common diagnostic tests, providing critical insights into kidney function, metabolic health, and infections. The standard 10-parameter dipstick is a marvel of biomedical engineering, but its interpretation remains surprisingly analog and subjective. In a clinical setting, a nurse or lab technician holds the strip up to the light, compares each pad to a color reference chart on the bottle, and makes a visual judgment call
This process is prone to human error, inconsistent lighting, and color perception differences. For an autonomous health pod like AuraPod, automating this with clinical-grade reliability was a must. The goal wasn’t just to take a picture of a dipstick; it was to replicate and exceed human accuracy under any condition
In this article, I’ll walk through the complete computer vision (CV) pipeline we built to solve this problem, from hardware selection to the AI model that makes the final call
The Hardware Setup: Controlling the Variables
The first lesson in medical CV is that you cannot fix bad data in software. To build a reliable system, we had to control the physical environment meticulously
Our imaging hardware stack:
- High-Resolution Camera: A 12MP, global shutter CMOS sensor to eliminate motion blur.
- Controlled Lighting Array: A ring of 6500K daylight-balanced LEDs with a diffuser to provide even, shadow-free illumination across all pads.
- Enclosed Imaging Chamber: The dipstick is inserted into a light-proof chamber to eliminate ambient light contamination, the single biggest source of error.
- Color Reference Card: A fixed, calibrated color calibration card (like an X-Rite ColorChecker) is positioned within the chamber’s field of view. This is our secret weapon for overcoming color drift.
This setup ensures that every image is captured under identical lighting conditions, making the software’s job infinitely easier.
The Software Pipeline: A Step-by-Step Breakdown
The CV pipeline is a sequence of carefully orchestrated steps. If any one step fails, the entire process fails.
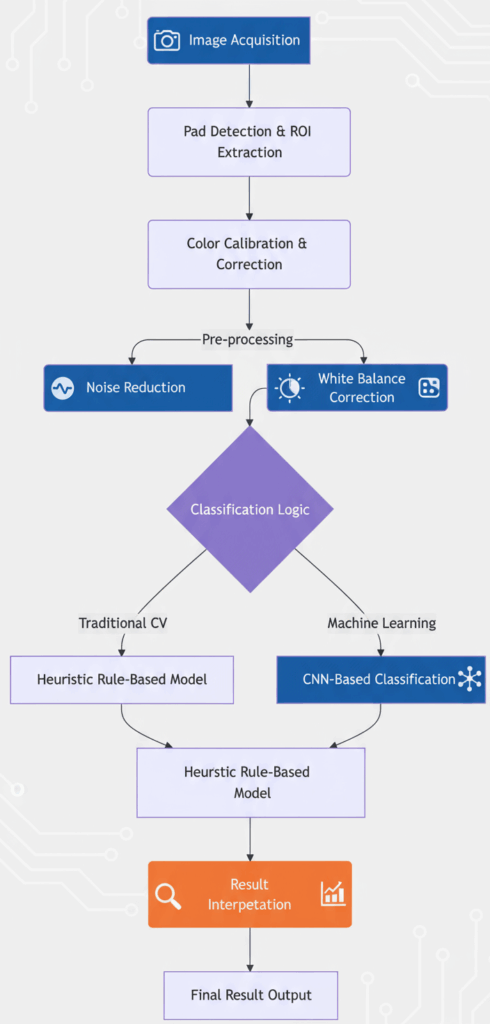
Step 1: Pad Detection and Region-of-Interest (ROI) Extraction
The first task is to find the dipstick in the image and isolate each of the 10 test pads.
- Find the Stick: We convert the image to grayscale and apply a series of morphological operations (erosion and dilation) to highlight the long, rectangular shape of the dipstick.
- Perspective Correction: The dipstick is rarely perfectly aligned. We use the Canny edge detector and Hough line transform to find its edges and apply a perspective transformation to “flatten” it.
- Extract Pads: Once we have a rectangular image of the stick, we know the approximate Y-coordinate for each pad. We split the stick into 10 predefined vertical segments and then within each segment, we use contour detection to find the exact bounding box for each pad.
```python
 Pseudocode for pad extraction
def extract_pads(image):
    gray = cv2.cvtColor(image, cv2.COLOR_BGR2GRAY)
    edges = cv2.Canny(gray, 50, 150)
    lines = cv2.HoughLinesP(edges, 1, np.pi/180, threshold=50, minLineLength=100, maxLineGap=10)

     Find dominant lines to define dipstick edges
     ... logic to find left and right edges ...

     Apply perspective transform to get top-down view
    transformed = apply_perspective_transform(image, left_edge, right_edge)

     Split transformed image into 10 ROIs based on known pad positions
    pad_rois = []
    for i in range(10):
        y_start = i  pad_height
        y_end = (i+1)  pad_height
        pad_roi = transformed[y_start:y_end, :]
        pad_rois.append(pad_roi)
    return pad_rois
```
Step 2: Color Calibration – The Most Critical Step
This is where we solve the lighting problem. Even in our controlled chamber, minor variations occur. The color calibration card has known reference colors (RGB values). By comparing the actual photographed color of these squares to their expected values, we can calculate a color transformation matrix for the entire image.
We use a polynomial mapping algorithm to create a function that corrects all colors in the image, including our dipstick pads. This ensures that the RGB values we analyze are consistent from one scan to the next, regardless of infinitesimal changes in LED temperature or camera sensor drift.
Step 3: Feature Extraction
For each calibrated pad ROI, we don’t just take the average color. We extract multiple robust features:
- Mean RGB and LAB values: The LAB color space is designed to be more perceptually uniform.
- Texture descriptors: Like Haralick features (e.g., contrast, entropy), which can be crucial for pads like “Blood” where speckling patterns matter.
- Spatial information: For pads with two chemicals (like the pH pad), we check for color gradients.
Step 4: The Classification Model(s)
We implemented a hybrid approach for maximum robustness:
- Heuristic Model (First Pass): This is a simple, rules-based model. It calculates the Euclidean distance between the extracted LAB value of the pad and the known LAB values of the reference chart. The closest match wins. This model is extremely fast, transparent, and works perfectly for ~95% of samples.
- Machine Learning Model (Tie-Breaker and Validator): For ambiguous cases where the distances are too close to call, we employ a Convolutional Neural Network (CNN). We trained a lightweight CNN (based on a modified MobileNetV2 architecture) on thousands of labeled dipstick images. This model looks at the entire patch of pixels and learns subtle contextual cues that a simple distance metric might miss. It’s slower but more powerful.
python
# Pseudocode for the hybrid classification
def classify_pad(pad_image, pad_index):
    # Extract features
    lab_values = extract_lab_features(pad_image)
    texture = extract_haralick_features(pad_image)

    # Rule 1: Heuristic Model
    reference_chart = load_reference_chart()
    distances = [cv2.norm(lab_values - ref_color) for ref_color in reference_chart]
    heuristic_result = np.argmin(distances)

    # Rule 2: If confidence is low, use ML model
    min_distance = np.min(distances)
    if min_distance > CONFIDENCE_THRESHOLD:
        ml_result = ml_model.predict(pad_image)
        return ml_result
    else:
        return heuristic_result
Validation and Clinical Concordance
A tech demo isn’t enough. For a medical device, we must validate against gold-standard laboratory equipment. Our protocol was rigorous:
- We collected over 500 urine samples.
- Each sample was tested three ways: 1) With our AuraPod scanner, 2) By human technicians using the same dipstick, and 3) On a professional-grade clinical chemistry analyzer (our gold standard).
- We measured concordance: Our system achieved >98% agreement with the lab analyzer, significantly outperforming human visual interpretation, which hovered around 90-92% agreement.
Lessons Learned the Hard Way
- The Paper Bottle is the Enemy: The reference chart on the dipstick bottle is printed on paper, which fades and varies between batches. We now use a digital reference stored in our system’s database, updated for each new lot of dipsticks we use.
- Timing is Everything: Some pads (e.g., Leukocytes) must be read at exactly 60 seconds. Our system uses a precise timer and a video stream to find the exact frame at the 60-second mark.
- “Invalid” is a Valid Result: Sometimes the sample is too concentrated, or a pad is damaged. Teaching the AI to confidently return an “Invalid, please retry” result was as important as teaching it to read correctly.
Conclusion
Automating a seemingly simple task like reading a dipstick requires a deep appreciation for both computer science and the real-world chaos of biology. By combining a controlled hardware environment, rigorous color science, and a hybrid AI approach, we built a system that delivers not just results, but trustworthy results.
This attention to detail is what separates a clinical-grade diagnostic from a consumer gadget. It’s a philosophy we apply to every sensor in the AuraPod.
How do you design an AI interface that users actually trust? The next article breaks down the UX principles behind our voice-first health interface. Follow to learn how we blend AI with empathy.
Let’s connect on LinkedIn to discuss computer vision, healthcare technology, and embedded AI systems.